I've Moved!

I've Moved!
Please visit my new blog!

This blog contains affiliate links!

Some of the links in the posts on this blog are “affiliate links.” This means if you click on the link and purchase the item, I will receive an affiliate commission (Thank you!) Regardless, I only recommend products or services I believe will add value to my readers.
Email me ..........................
Showing posts with label Giveaway. Show all posts

Thursday, February 25, 2016

New Kiwi Lane Templates & Paper!


New products are now available from Kiwi Lane!! These new items are only available now through Kiwi Lane Instructors.  You can find these in the "New Release" category on my Instructor site.

Enjoy the Ride Paper KitNew Kiwi Lane!! Only available via Instructors! LisasWorkshop.blogspot.com

Hope Accessory SetNew Kiwi Lane!! Only available via Instructors! LisasWorkshop.blogspot.comNew Kiwi Lane!! Only available via Instructors! LisasWorkshop.blogspot.com

McKay Blvd Border SetNew Kiwi Lane!! Only available via Instructors! LisasWorkshop.blogspot.com

New Kiwi Lane!! Only available via Instructors! LisasWorkshop.blogspot.com


Win a HOPE Accessory Set!!New Kiwi Lane!! Only available via Instructors! LisasWorkshop.blogspot.com

The Hope Accessory Set is perfect for when the stork makes that most special delivery to you or someone you know. Want to win a FREE Hope Accessory Set of your own? Head over to the Kiwi Lane Facebook Page and leave a comment in this post about which Hope Template Number (1-5) you think will be your favorite to use once you have your own Hope Accessory Set.  The winner will be announced later this evening on the Kiwi Lane Designs Facebook page so make sure to comment now to be entered into win.


***If you live outside the U.S. you will be issued a Kiwi Lane Gift Card Credit instead of receiving the physical prize.***

See more samples featuring the Hope set on the Kiwi Lane Blog.

Don’t forget:  Kiwi Lane shipping is FREE when you order $35 or more and only $5 for orders under $35!  Also the Feb. specials are Clara Lane & Sweetheart!
New Kiwi Lane!! Only available via Instructors! LisasWorkshop.blogspot.com

Monday, December 7, 2015

CM Circles and Ovals Blog Hop!

Seasons Greetings! 

You have reached the fourth stop on the CM Circles and Ovals Blog Hop.  My fellow CM Advisors and I are sharing some ideas and inspiration featuring some old friends – the Custom Cutting System (CCS) Circle & Oval patterns!
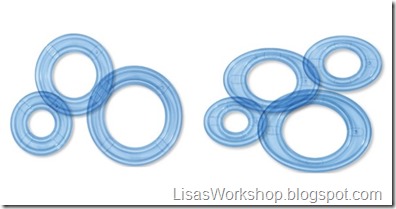
CCS circles & ovals are BACK!  CCS Blog Hop @ Lisa's Workshop
These will be added to the CM core line but there is no telling how long this first shipment will last. Fair warning - if these go quickly there could be a bit of lag time until the next shipment arrives. 

0133c946bb12ee9503d61cd60c36a5afb2a14dd64d
Instructions for these CCS cuties are soon to follow but first I’d like to share a system I learned a long time ago in my early years as a CM Consultant.

Labeling Your CCS Circles & Ovals
This method saves a lot of time & effort when following directions for a project.  By using this system you can easily know exactly what size oval or circle to cut when following instructions at a class, workshop or online.  It also makes sharing instructions a breeze!

Here is how to label your templates:

Using a permanent marker, label the sizing chart and patterns 1 through 7 using the following system:

Circles (1-3) - 1 is the smallest circle, 3 is the largest

Ovals (4-7) - 4 is the smallest oval, 7 is the largest

Label your CCS patterns -  CCS Blog Hop @ Lisa's Workshop
While you’re at it – you might want to label your patterns & cutting guides with your initials, too.  Lots of people have the same tools & labeling them with your name or initials makes it a snap to see what is yours when cleaning up at a crop.

CCS circles & ovals are BACK!  CCS Blog Hop @ Lisa's Workshop
The following abbreviations are used in projects:

I = Inside Track O = Outside Track

R =Red Blade     G = Green Blade     B = Blue Blade
If a layout calls for the following:  1 I R (2) then you would use the smallest circle pattern (#1), cut on the Inside of the pattern with the Red blade and cut 2 circles.

Let’s give it a whirl!

Gingerbread BoyCCS circles & ovals are BACK!  CCS Blog Hop @ Lisa's Workshop
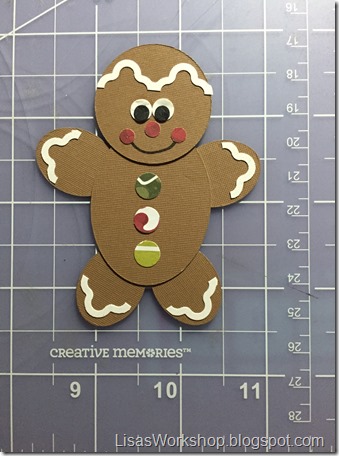
Using the dark brown Designer Cardstock from the
Shades of Neutral paper pack cut the following shapes using the Custom Cutting System:
Head:  1IR
Body: 5IR
Arms:  4IG(4)

Buttons, Eyes, Nose & Cheeks: leftover circles from the
Border Maker System and the Bubbles Cartridge using the following papers:

Christmas Joy paper pack
Red striped paper for the nose and cheeks
Christmas Countdown Days for the buttons
Black & white Designer Cardstock from the
Shades of Neutral paper pack for the eyes.
Icing: Punch several short borders using the
Medallion Frame Chain Cartridge and the Border Maker System.  Cut chains lengthwise in half and then trim pieces as shown.
Adhere everything with your Regular & Mini Tape Runners.

Gingerbread GirlCCS circles & ovals are BACK!  CCS Blog Hop @ Lisa's Workshop
Use the same method we did to make the Gingerbread boy but punch only one button and add the following: 

Dress:  5IR - cut from the red striped paper from the Christmas Joy pack.  Cut a small notch from one shorter end of the oval and trim the opposite end.
Punch one shape using the
Blossom Place n Punch and trim as shown.
CCS circles & ovals are BACK!  CCS Blog Hop @ Lisa's Workshop
Flower:  From the red striped paper use one leftover shape punched using the
Medallion Frame Chain Cartridge and the Border Maker System. CCS circles & ovals are BACK!  CCS Blog Hop @ Lisa's Workshop

CCS circles & ovals are BACK!  CCS Blog Hop @ Lisa's Workshop

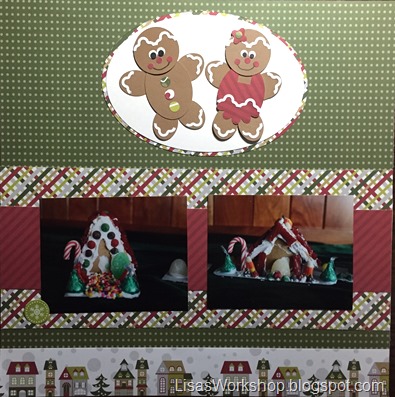
I like to showcase a special photo by using the CCS to cut it into a circle or oval shape – matting it for even more emphasis. CCS circles & ovals are BACK!  CCS Blog Hop @ Lisa's Workshop

Thank you for stopping by!  Be sure to visit all of the fantastic blogs for more ideas!!  Your next stop is Celebrating Your Beautiful Life by Fran Smitherman.

Here’s a complete list of all the stops on this CM Blog Hop in case you lose your way:

Stop 1 - Julie Tambrini
Stop 2 - Diana Brinsley
Stop 3 - Stefani Jones
Stop 4 - Lisa Graham <=== You Are Here
Stop 5 - Fran Smitherman
Stop 6 - Noreen Smith
Stop 7 - Candace Bouldin

CCS circles & ovals are BACK!  CCS Blog Hop @ Lisa's Workshop

After you’ve visited all the Blog Hop stops head on over to the CM blog!  CM is giving away a CCS bundle - including the hexagon bundle (with the jumbo hexagon CCS template, all 3 blades and the self-healing mat) plus the circles and ovals!  Leave a comment after the blog hop post on the CM blog for a chance to win this fantastic prize pack!!

01442f8899af25278625c3c85ca5e886f28e8c3578

  • Cut out 6 rings. In the example above I cut 2 sets of rings from 3 different papers.
  • Determine what size and shape rings you want.  The wreath above was created by cutting 5OG & 5OR..
  • If cutting on the outside track of the pattern cut the larger shape first, then the smaller one.  Do the opposite when cutting on the inside of the pattern (cut smaller shape first).
  • Be careful not to move your paper or the CCS pattern until you are completely done.
  • Layer the rings and adhere stickers or other embellishments. 
  • To make the wreath shown above I used items from the Christmas Joy Paper and Sticker packs.
    Inspired by an idea borrowed from Donna Bobbie, R.I.P.

Tuesday, November 10, 2015

$1,200 Product Giveaway from Scrapbook.com

Scrapbook.com giveaway

Holy cow, that’s a lot of stuff!! 

One lucky Scrapbook.com subscriber will receive over $1,200 in beautiful, best-selling products from Scrapbook.com (prize shown in picture above).

There are 4 ways to enter this giveaway.  You will need to sign up for the newsletter and then you’ll get extra entries for following Scrapbook.com on Instagram, signing up for a free class & telling friends about the giveaway. (I signed up for Cardmaking 201 with Stephanie Barnard and Document your December)

Scrapbook.com giveaway

Click here to sign up for the Scrapbook.com newsletter and earn a chance at this fantastic prize package!! 

Good Luck!!

Friday, November 6, 2015

CM Holiday Blog Hop–Stop #3

Hello!!  
You have reached the third stop on the CM Holiday Blog Hop.  My fellow CM Advisors and I are handing out some Holiday treats: ideas and inspiration for your pages, cards and tags featuring Creative Memories products.
I hope you are inspired by these Christmas Cuties!
CM Holiday Blog Hop!!This layout features papers, stickers and a Slide-In piece from the Christmas Joy product line. CM just released some wonderful new products – including some old favorites, too!   You can see all the wonderful newly released products by clicking on “What’s New” at the top of your CM Advisor’s site.  (If you already are working with a CM Advisor you’ll be taken to their site when clicking on links in this post. If you don’t have an Advisor already you’ll be taken to my CM Advisor site.)
Many of these Christmas Cuties need just a few shapes punched with the Border Maker System.  Did you know you can quickly do this without using the positioning guide?  Just pop in the cartridge, punch what you need & you’re good to go! CM Holiday Blog Hop!!
Christmas Cuties
Rudolph
CM Holiday Blog Hop!!Head: Circle Cartridge from the Shape Maker System
Muzzle: From the light brown cardstock (Shades of Neutral) punch a tag using the Circle Tag Cartridge with the Shape Maker System.  Cut out the inside circle.
Nose & Eyes:  Circle leftovers from the Bubbles Cartridge and the Border Maker System.
Ears:  Using the Picket Fence Cartridge and the Border Maker System punch out a partial border from the dark brown and light brown Designer Cardstock from the Shades of Neutral paper pack.  Clip off two of the top triangular pieces from each color and layer them - offsetting the lt. brown below the dk. brown a bit. Adhere to the back of Rudolph’s head.
Antlers:  Use the leftovers from the Diamond Scroll Cartridge and Border Maker System. Cut them apart to get the swirls, layer and adhere as shown using the wonderful Mini Tape Runner!!!!  I’m so glad this is back!  Remember, this Mini Tape Runner Refill fits in the regular CM Tape Runner!!
Mouth: Draw using the fine point of the Black Dual Tip Pen.

Santa CM Holiday Blog Hop!!
Body: Using the Circle Cartridge from the Shape Maker System punch the following circles:  one light brown (Shades of Neutral), two red circles (Shades of Red), one white circle (Shades of Neutral) and also this shape from the corner of a piece of white cardstock:
CM Holiday Blog Hop!!
Use the Two Way Corner Rounder to round the pointed corner of the white piece.
Cut the light brown circle in half. 
Place the red circle on the bottom, then adhere the white circular shape on top of that and then the half circle on top. 
Santa’s Beard: Use the leftover pieces from the Diamond Scroll Cartridge and Border Maker System.  Cut them apart to get the swirls, adhere as shown.
Hat:  Place the white and red circles behind Santa’s head as shown above.  Use one of the large leftover circles from the Bubbles Cartridge and the Border Maker System for the pompom on Santa’s hat.
Belt:  Cut a thin strip of black cardstock using either your Personal Trimmer or the 12” Trimmer. For the buckle use the Filmstrip Cartridge with the Border Maker System and punch out a small border out of gold cardstock (Shades of Bright.)  Trim down one of the hollow squares on the edge of the border.
Santa’s Face:  Use leftover circles from the Bubbles Cartridge and the Border Maker System for the eyes (lt. blue from the Shades of Pastel paper pack), nose, cheeks and mouth.  For Santa’s mustache trim a tree punched out of white cardstock using the Evergreen Cartridge with the Border Maker System. (See image below)
Place the holly sticker from the Christmas Joy Sticker Pack on Santa’s hat.  Ho Ho Ho!!
CM Holiday Blog Hop!!
Snowman
CM Holiday Blog Hop!!
Body:  Circle Cartridge from the Shape Maker System.
Head:  Inside circle from the Circle Tag Cartridge using the Shape Maker System.
Scarf: Using the Shape Maker System and the Circle Tag Cartridge, punch a tag from the plaid paper from the Christmas Joy paper pack.  Trim the inner circle from the tag and place this between the body and head.  For the ends of the scarf, punch a small border using the Filmstrip Cartridge and the Border Maker System from the plaid paper.  Trim off the edge of the border with the small squares.  Trim the ends to make fringe and separate these pieces just a bit. 
Face:  Eyes and mouth – leftovers from the Border Maker System and the Bubbles Cartridge
Nose:  Cut in half one of the leftover small rectangles punched out of orange cardstock using the Picket Fence cartridge and the Border Maker System. Add detail using the fine point of the Black Dual Tip Pen.

Penguin
CM Holiday Blog Hop!!
Body:  Circle Cartridge from the Shape Maker System.
Tummy: Inside circle from the Circle Tag Cartridge using the Shape Maker System.
Wings:  Use the Circle Cartridge with the
Shape Maker System and punch out a circle from black cardstock. Position the circle back in the cartridge to punch out the shape for the wings (punch 2).
Hat:  Punch white and red circles using the Shape Maker System and place them behind the penguin’s head as shown above.  Use one of the large leftover circles from the Bubbles Cartridge and the Border Maker System for the pompom.
Eyes: leftover circles from the Border Maker System and the Bubbles Cartridge
Nose:  Cut down a tree punched from orange cardstock using the Evergreen Cartridge and the Border Maker System.
Flippers:  Punch out a shape using the Blossom Place n Punch. Cut this in half, then in quarters. Use a quarter of the blossom for each flipper.

Page Elements Trim one of the pieces from the Christmas Joy Slide-in Pack to make a festive place for journaling or a title.
CM Holiday Blog Hop!!
Cut 1/2” strips of various papers from the Christmas Joy Paper Pack and tuck behind one of the photo mats.  Notch the ends with your CM All Purpose Scissors. (Remember those lovely original CM scissors?  They’re back – just as good as you remember but with a little updated look!)CM Holiday Blog Hop!!
Cut the holly strip from the piece of paper shown below and adhere where the green & silver pieces of paper meet.  I cut the green dotted paper a little over 3” wide and the silver paper just over 9” wide. (Click here to view each of the 12x12 papers) Photo mats are 4 1/2” x 6 1/2”.
CM Holiday Blog Hop!!
Thank you for stopping by!  Be sure to visit all of the fantastic blogs for more ideas!!  Your next stop is Celebrating Your Beautiful Life by Fran Smitherman.
Here’s a complete list of all the stops on this CM Holiday Blog Hop in case you lose your way.
Stop 2. Crop with Stef
Stop 3.  Lisa's Workshop <=== You Are Here
Don’t forget to check out the CM blog, too!  They have been sharing awesome ideas all week long as part of their Birthday Bash!!
011df6e66c5bd4b3ef88371f9df6da92142c63996c
(Blossom Place n Punch to make the pieces for the wreath, leftovers from the Bubbles Cartridge  and the Border Maker System to make the berries.  “Merry Christmas” sticker from the Christmas Joy Sticker Pack.)

Monday, October 19, 2015

CM Halloween Blog Hop - Stop #4

Come in and sit for a spell! 

You have reached the fourth stop on today's Halloween Blog Hop.  My fellow CM Advisors and I are handing out some sugar-free goodies: ideas and inspiration for your Halloween pages and paper crafts featuring Creative Memories products. After you’re done visiting all the CMAs blogs be sure to visit the CM Blog & leave a comment for a chance to win some fun treats (no tricks)!

CM Halloween Blog Hop

How about some fun Halloween punch art? 

CM Blog Hop 

The paper I used in the background is from the new Trick or Treat paper pack.

Look at all these fun papers that will be the perfect compliment to your Halloween photos…and the new Trick or Treat stickers, too!  CM Halloween Blog Hop - Lisa's Workshop
The Gold ABC/123 Stickers work beautifully with these fun new Halloween themed products. (Thanks Candace for this great picture!)

Need a closer look at that fun Pumpkin Patch black (bookcloth) Mica album?  Here you go!
CM Halloween Blog Hop - Lisa's Workshop

Here is a close up of each each member of this “too cute to spook” group and the tools I used to create them:

BatCM Halloween Blog Hop - Lisa's Workshop

Body: use the new Two-Way Corner Rounder on a corner of Black Cardstock first, the use the Circle Cartridge and the Shape Maker System to cut out the rest of the shape. (Did you know that the wonderful, smooth, solid colored cardstock so many of us miss is back while supplies last?!  Check out the Going Gone section of my CM Advisor site while it’s still available!!)
Wings: use the Blossom Place n Punch first then use the Circle cartridge with the Shape Maker System.  Cut this in half for the wings. (See photos below).
Eyes:  Leftover pieces from the Border Maker System and the Bubbles Cartridge.
Mouth: Leftover pieces from the Border Maker System and the Picket Fence Cartridge (comes with the system).

CM Halloween Blog Hop - Lisa's WorkshopCM Halloween Blog Hop - Lisa's Workshop

Spider
CM Halloween Blog Hop - Lisa's Workshop

BodyShape Maker System and Circle cartridge (punch 2)
Head: Inside of the Circle Tag made using the Shape Maker System.
Legs: Leftover pieces from the Circle Tag used with the Shape Maker System.
Eyes:  Leftover pieces from the Border Maker System and the Bubbles Cartridge.
For easy assembly layer the legs and head between the 2 larger circles.

Green Guy
CM Halloween Blog Hop - Lisa's Workshop
Head
: Using the same technique as we did for the bat first use the Two Way corner Rounder then finish with the Circle Cartridge with the Shape Maker System.
Ears: A Leftover rectangle from the Filmstrip Cartridge used with the Border Maker System cut in half
Eye:  Leftover pieces from the Border Maker System and the Bubbles Cartridge.
Mouth:  Leftover pieces from the Circle Tag used with the Shape Maker System.
Fang: A Leftover rectangle from the Filmstrip Cartridge used with the Border Maker System cut in half and trimmed down.

Purple Guy
CM Halloween Blog Hop - Lisa's Workshop
Head:  Circle Cartridge with the Shape Maker System.
Eyes & Nose:  Leftover pieces from the Border Maker System and the Bubbles Cartridge.
Mouth & Stems for Eyes:  Leftover pieces from the Circle Tag used with the Shape Maker System.
Fangs: A Leftover rectangle from the Filmstrip Cartridge using the Border Maker System cut in half and trimmed down.

Little DevilCM Halloween Blog Hop - Lisa's Workshop
Head: Using the same technique as we did for the bat first use the Two Way corner Rounder then finish with the Circle Cartridge with the Shape Maker System.
Ears/Horns: A Leftover rectangle from the Filmstrip Cartridge using the Border Maker System cut in half
Eyes:  Leftover pieces from the Border Maker System and the Bubbles Cartridge. 
Mouth:  Leftover pieces from the Circle Tag used with the Shape Maker System.
Fang: A leftover rectangle from the Filmstrip cartridge using the Border Maker System cut in half and trimmed down.
Tail: Leftover pieces from the Circle Tag used with the Shape Maker System and a piece from the Filmstrip Cartridge using the Border Maker System cut in half and trimmed down.

Moon
CM Halloween Blog Hop - Lisa's Workshop
Use the Circle cartridge with the Shape Maker System and punch out a circle. Position this piece back in the cartridge to punch out the piece, leaving the crescent shape for the moon.

Black Cat
CM Halloween Blog Hop - Lisa's Workshop
Body:  Use the same technique described above used to make the moon.
Head: Inside of the Circle Tag made using the Shape Maker System
Whiskers & Tail: Leftover pieces from the Circle Tag used with the Shape Maker System.
Eyes & Nose: Leftover pieces from the Border Maker System and the Bubbles Cartridge.
Ears:  A Leftover rectangle from the Filmstrip cartridge and the Border Maker System cut in half.

Skeleton
CM Halloween Blog Hop - Lisa's Workshop
Head, Ribs & Pelvis: Leftover pieces from the Circle Tag used with the Shape Maker System.
Bones & Feet: Leftover pieces from the Picket Fence cartridge used with Border Maker System. Cut one in half for the feet. 
Hand with Fingers: Cut down a piece made with the Filmstrip cartridge and the Border Maker System.
Shoulder, Elbow & Knee joints,
Eyes and Mouth: Leftover pieces from the Border Maker System and the Bubbles Cartridge.

Lots of tiny pieces were used to make this crew!  Use your Multi Purpose Tool to position single strips of Tape Runner adhesive on these small parts. Sure makes me miss that Mini-Tape Runner!  (Between you & me…it’s scheduled to make a comeback – not sure exactly when, but it’s in the works!!)

Thanks for stopping by!   The fun continues over at Fran’s blog, she is the next stop on our CM Halloween Blog Hop!  

In case you get lost along the way here is the list of all the stops on this fun Blog Hop:

Stop 1 - Sarah Fitzgerald
Stop 2 - Julie Tambrini
Stop 3 - Candace Bouldin
Stop 4 - Lisa Graham <------You Are Here!
Stop 5 -
Fran Smitherman
Stop 6 - Diana Brinsley 
Stop 7 - Stefani Jones

After you’ve completed the Blog Hop don’t forget to visit the CM Blog and leave a comment for a chance to win some fun treats!

Happy Halloween!!