I've Moved!

I've Moved!
Please visit my new blog!

This blog contains affiliate links!

Some of the links in the posts on this blog are “affiliate links.” This means if you click on the link and purchase the item, I will receive an affiliate commission (Thank you!) Regardless, I only recommend products or services I believe will add value to my readers.
Email me ..........................
Showing posts with label Creative Life Scrapbooking. Show all posts

Wednesday, May 29, 2019

2019 Spring CLS Blog Hop


Welcome to Creative Life Scrapbooking's (CLS) 2019 Spring Blog Hop! 

If you’re hopping in order, you came from Stefani's Blog.  At the end of my post I’ll send you on your way to Fran’s blog. Be sure to visit each stop – there are lots of  wonderful ideas being shared!  (More info, including the complete list of Blog Hop stops, is at the bottom of this post.)
Today I’m sharing layouts using products from Creative Memories and featuring the Travel Log and Great Excape Collection. The photos are from one of our stops during our Alaska Cruise when we visited Carcross.  Where is Carcross?  I'm glad you asked!


Lisa's Workshop - Spring Blog Hop  Canada and Alaska Cruise Photos
Papers from the CM Great Escape Collection
 
Lisa's Workshop - Spring Blog Hop  Canada and Alaska Cruise Photos
Embellishment from the CM Travel Log Collection
To make the globe I used the Custom Cutting System and the Jumbo Circle Pattern. This is now retired but if you would like to use one (or other retired tools) contact your CM Advisor.
Chances are they have one you can borrow!
The paper I used for this globe layout is from the Great Escape Collection and I thought it was perfect for these photos!  Don't worry if you love the colors in this collection but don't have Canadian themed photos - the designers at CM have wisely designed the printed paper packs so that one side of the paper is generic. 
Lisa's Workshop - Spring Blog Hop  Canada and Alaska Cruise Photos

Lisa's Workshop - Spring Blog Hop  Canada and Alaska Cruise Photos

Thanks for stopping by!  I hope these ideas have inspired you and I can't wait to see your take on them!  Please feel free to share what you've created in my Lisa's Workshop Facebook Group Here is the complete line up for today’s
Creative Life Scrapbooking’s 2019 Spring Blog Hop:
 
Noreen Smith
Karyn McDermaid-Rolfe
Julie Tambrini
Diana Miller Brinsley
Stefani Jones
Lisa Brown Graham (you are here!)
Fran Allen Smitherman

Please contact your Creative Memories Advisor to purchase any Creative Memories products.
If you don't already have a Creative Memories Advisor, I’m happy to help! 
You can find more information about the Creative Memories products used in this project on my CM Advisor site at:
http://www.creativememories.com/user/lisagraham
or if you’d like to contact me directly you can do that by clicking on the “Email me” link at the top of this page.
Photobucket

Wednesday, February 27, 2019

2019 Winter CLS Blog Hop


Welcome to Creative Life Scrapbooking's (CLS) 2019 Winter Blog Hop! Bundle up and grab something warm to drink as we share some fun ideas!
If you’re hopping in order, this is the start of the Blog Hop.  At the end of my post I’ll send you on your way to Noreen’s blog. Be sure to visit each stop – there are lots of  wonderful ideas being shared!  (More info, including the complete list of Blog Hop stops, is at the bottom of this post.)
Today I’m sharing a layout using products from Creative Memories and featuring the  Ever After Collection.  Yes, this collection is designed for wedding photos BUT it has some absolutely gorgeous papers and elements that can be used for most any photos!  CM Designers have wisely created most of the papers & mats so that they have a non-themed design on one side. 

Papers, journaling mat and frames from the Ever After Collection by Creative Memories

 This paper with the wood pattern is my favorite and, being the frugal scrapper that I am, I cut out the center of the paper to use on another project.  Once it's in my album no one will ever notice!


 I needed a banner shape just a little longer than the CM Banner Flag Punch created so I cut a strip of paper as wide as the banner and put only the bottom edge in the Punch.  I also used this technique on both sides of a strip of paper to make the journaling strip on the left side of the layout.
Using the fine point side of a CM Brown Dual Tip Pen, I added a little bit of pen stitching to the banners and journaling strips to help them stand out a bit.
Thanks for stopping by!
I hope these ideas have inspired you and I can’t wait to see your take on them! Please feel free to share what you’ve created in my
Lisa’s Workshop Facebook group.


Here is the complete line up for today’s
Creative Life Scrapbooking’s 2019 Winter Blog Hop:

Lisa'sWorkshop
Organized and Creative Mom
Karyn Crops
Julie's Creative Memories Blog
Scrappin' JPEGS
D. Brinsley's Memory Keeping Blog
Crop With Stef

Please contact your Creative Memories Advisor to purchase any Creative Memories products.
If you don't already have a Creative Memories Advisor, I’m happy to help! 
You can find more information about the Creative Memories products used in this project on my CM Advisor site at:
http://www.creativememories.com/user/lisagraham
or if you’d like to contact me directly you can do that by clicking on the “Email me” link at the top of this page.

Photobucket

Tuesday, January 30, 2018

Winter Blog Hop with Creative Life

Welcome to Creative Life Scrapbooking's (CLS) Winter Blog Hop! Bundle up and grab something warm to drink as we celebrate winter!

If you’re hopping in order, you’ve arrived from Karyn’s blog.  At the end of my post I’ll send you on your way to Sarah’s blog. Be sure to visit each stop – there are lots of  wonderful ideas being shared!  (More info, including the complete list of Blog Hop stops, is at the bottom of this post.)

Today I’m sharing a layout using products from Creative Memories and featuring the Glacier Collection. CLS winter blog hop - Lisa's Workshop

I love winter and that’s a good thing because here in SE Michigan, we usually get a nice amount of snow each year.  Winter usually lasts long enough to get in some snow related fun and then,  just when you think you’ll freeze to death – spring arrives! 

I am loving the Glacier collection by CM.  It features a stunning range of frosty blue hues inspired by a winter wonderland filled with cold temps, warm hearts and snow. CLS winter blog hop - Lisa's Workshop
The Glacier Paper Pack features designs infused with elements such as snowflakes and falling snow, birch tree bark and frosty pine tree branches, as well as watercolor patterns and canvas textures that will be the perfect backdrop for photos of your enchanted winter moments.  The paper also has neutral prints in beautiful blue hues that are perfect for everyday photos, too! 

CLS Winter Blog Hop - Lisa's Workshop

To create the snowflakes shown below, use the Original Border Maker System and the Arrow Cartridge. Snip off the head of each punched arrow and also some of the tail pieces.  Arrange them in the patterns shown to create snowflakes.  Embellish with flowers and gems from the Denim Blues Embellishment pack (available while supplies last).CLS Winter Blog Hop - Lisa's Workshop

CLS Winter Blog Hop - Lisa's Workshop

CLS Winter Blog Hop - Lisa's Workshop

To create the winter hat, use the Custom Cutting System and the Oval Patterns to cut a 5IR oval from Glacier Patterned Paper.  Cut the oval in half and add a strip of coordinating paper to the bottom and a couple of small flowers from the Daisy Bouquet Punch for the pompom.
(If you are not familiar with the system used to label the CCS see this post.)

Making the scarf is as easy as cutting a piece of patterned paper, folding it and cutting the ends for fringe with your All Purpose Scissors!

These cute bundled up birdies and other stickers are from the Glacier Sticker Pack.

CLS winter blog hop - Lisa's Workshop

I elevated them a bit using Foam Squares.
Photo mats are from the Glacier Variety Mat Pack.

CLS Winter Blog Hop - Lisa's Workshop

Thanks for stopping by!
I hope these ideas have inspired you and I can’t wait to see your take on them! Please feel free to share what you’ve created in my
Lisa’s Workshop Facebook group. 

If you’re looking for more winter ideas you’ll find some in this earlier blog post.

Here is the complete line up for today’s
Creative Life Scrapbooking’s Winter Blog Hop:

Please contact your Creative Memories Advisor to purchase any Creative Memories products.
If you don't already have a Creative Memories Advisor, I’m happy to help! 

You can find more information about the Creative Memories products used in this project on my CM Advisor site at:
http://www.creativememories.com/user/lisagraham
or if you’d like to contact me directly you can do that by clicking on the “Email me” link at the top of this page.

Tuesday, June 6, 2017

Summer Scrapbook Ideas You Can Use Now!

Welcome to Creative Life Scrapbooking's (CLS) Summer Blog Hop!
If you’re hopping in order, you’ve arrived from Karyn’s blog.  At the end of my post I’ll send you on your way to Julie’s blog. Be sure to visit each stop – there are lots of  wonderful ideas being shared!  (More info, including the complete list of Blog Hop stops, is at the bottom of this post.)
Today I’m sharing a layout using products from
Creative Memories and featuring the Made with Love Collection.
CLS Blog Hop - Summer Scrapbook Ideas You Can Use Now! Lisa's Workshop
This collection has lots of fun kitchen/recipe themed images but it’s versatile enough to use on everyday pages, too.  I think the page I created below would be perfect for generic summer photos – the colors are so fun and bright…cheerful!
CLS Blog Hop - Summer Scrapbook Ideas You Can Use Now! Lisa's Workshop
To make this layout, start with a piece of Black Cardstock for the base and add two strips of the green paper and one piece of the orange paper from the Made With Love Printed Paper Pack. (Click Here to take a look at the Made With Love Papers.) Punch two borders from Black Cardstock using the Border Maker System and the Scallop Dot Cartridge.  Add 3 4x6 pieces from the Made with Love Mat Pack as placeholders or mats for photos. 
For the border at the top of the page, punch another strip about 2” wide from
White Cardstock using the Border Maker System and the Scallop Dot Cartridge. Using the Shape Maker System and the Square Cartridge, punch out 5 squares from the red gingham paper and 3 from the yellow paper, both from the Made With Love Printed Paper Pack. Cut these in half and cut one of the red gingham triangles in half again.
    
I didn’t measure the placement of the triangles –
I eyeballed it and the
Repositionable Tape Runner Refill came in very handy while putting this border together.  I was able to make adjustments easily without tearing the paper.  I positioned the yellow triangles first, and then placed the red gingham pieces on top of those,  starting at the end and overlapping the ends just a bit.  CLS Blog Hop - Summer Scrapbook Ideas You Can Use Now! Lisa's Workshop

Play with the placement until it looks right – I needed to cover up the black paper but if you cut your white strip wider you can eliminate this issue.  Snip of the edges (when you’re satisfied with your border)for the 2 pieces at the end of the border.CLS Blog Hop - Summer Scrapbook Ideas You Can Use Now! Lisa's Workshop
I finished the layout by adding a little extra detail using stickers from the  Made With Love Sticker Pack.CLS Blog Hop - Summer Scrapbook Ideas You Can Use Now! Lisa's Workshop

CLS Blog Hop - Summer Scrapbook Ideas You Can Use Now! Lisa's Workshop
Thanks for stopping by! I will now send you on your way to the next stop in the Blog Hop -  Julie’s blog.
I hope these ideas have inspired you and I can’t wait to see your take on them! Please feel free to share what you’ve created in my
Lisa’s Workshop Facebook group.

Here is the complete line up for today’s
Creative Life Scrapbooking’s Summer Blog Hop:
Fran Allen Smitherman @Celebrating Your Beautiful Life
Sarah Fitzgerald @ Click Write Share
Noreen Smith @ Organized and Creative Mom
Karyn McDermaid-Rolfe @ Karyn Crops
Lisa’s Workshop <-----You are here!
Julie Tambrini @ Julie’s Creative Memories Blog
Stefani Jones @ Crop With Stef
CLS Blog Hop - Summer Scrapbook Ideas You Can Use Now! Lisa's Workshop
At CLS, we are a circle of photo lovers, memory keepers, scrapbooking and paper crafting enthusiasts, and bloggers. Our mission is to provide inspiration and education that will encourage people everywhere to celebrate their memories, exercise their crafty talents, and engage in a truly Creative Life!
Be sure to “Like” and follow our Facebook page at https://www.facebook.com/CreativeLifeScrapbooking/ for information about upcoming blog hops and more.

Monday, April 17, 2017

PJ Party Virtual Crop!!

Creative Life Scrapbooking PJ Party Virtual Crop!

Creative Life Scrapbooking is having our first  Pajama Party Virtual Crop on Friday, April 28th and I hope you’ll join us! We'll be sharing ideas and projects featuring the Woodland Whimsy Collection, Scallop Dot Border Maker Cartridge, and 4-Way Corner and Hole Punch from Creative Memoires.

What to do in the time leading up to the crop?  Join the Facebook event page, print your photos and order your supplies now so you can crop along with us and share your finished projects. Those sharing projects made with featured CM products will be eligible for prize drawings.

Creative Life Scrapbooking PJ Party Virtual Crop!

Hoping to crop with you on the 28th!

Sunday, April 2, 2017

Spring Blog Hop

Welcome to Creative Life Scrapbooking's (CLS)  Spring Blog Hop!

Creative Life Scrapbooking Blog Hop - Lisa's Workshop

At CLS, we are a circle of photo lovers, memory keepers, scrapbooking and paper crafting enthusiasts, and bloggers. Our mission is to provide inspiration and education that will encourage people everywhere to celebrate their memories, exercise their crafty talents, and engage in a truly Creative Life!
Be sure to “Like” and follow our Facebook page at
https://www.facebook.com/CreativeLifeScrapbooking/ for information about upcoming blog hops and more.

If you’re hopping in order, you’ve arrived from Karyn’s blog.  At the end of my post I’ll send you on your way to Diana’s blog. Be sure to visit each stop – there are lots of  wonderful ideas being shared!  (More info, including the complete list of Blog Hop stops, is at the bottom of this post.)

Today I’m sharing some fun Punch Art Pals for your spring pages. 
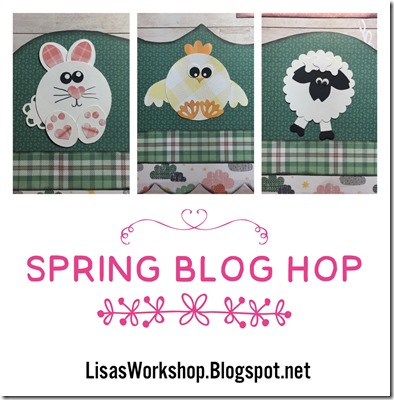
Creative Life Scrapbooking Blog Hop - Lisa's Workshop

For the project I created for this Blog Hop I used products from 3 of my favorite companies; Creative Memories, Fun Stampers Journey and Kiwi Lane.  Most of the papers I used are from CM’s Woodland Whimsy Girl Collection.

Creative Life Scrapbooking Blog Hop - Lisa's Workshop

Here’s how I made the fun Punch Art Pals
BunnyCreative Life Scrapbooking Blog Hop - Lisa's WorkshopCreative Life Scrapbooking Blog Hop - Lisa's Workshop
~Body
  Punch out a circle using the CM Shape Maker System with the Circle Cartridge from white cardstock
~Ears and Feet 
Using your
Custom Cutting System and Oval Patterns Make the following cuts:
White cardstock - 4IG x4
Pink Plaid paper from CMs
Woodland Whimsy Girl Paper Pack - 4IB x2 for the inside of the ears 
(If you are not familiar with the system used to label the CCS see this post.)
~Punch the following shapes using CMs Border Maker System:
~Lace Flower Chain Cartridge punch one flower from white cardstock and use for tail.
~Heart Chain Cartridge – punch once from the pink plaid paper from CM’s Woodland Whimsy Girl paper pack, saving the “leftover” hearts.  Use these hearts on the paws and for the nose.
~Using the Bubble Maker Cartridge punch several times out of black and white cardstock.  Use “leftovers” to make eyes. 
~Using the Bubble Maker Cartridge punch several times out of the pink plaid paper and use the “leftovers” on the top of the feet.
~Add detail with the fine tip end of CMs Black Dual Tip Pen.
~Assemble as shown below using your CM Tape Runner and the Repositionable Refill for intricate parts.

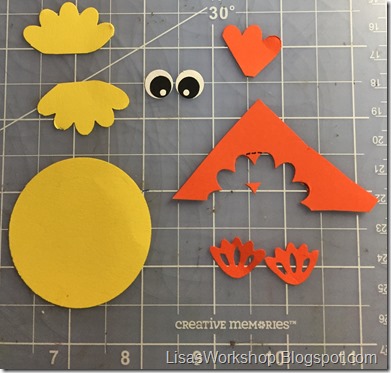
ChickCreative Life Scrapbooking Blog Hop - Lisa's Workshop
Creative Life Scrapbooking Blog Hop - Lisa's Workshop
~Body  Punch out a circle using the CM Shape Maker System with the Circle Cartridge from yellow cardstock (I used the yellow plaid from CM’s Hello Baby Girl paper pack in the layout shown below).
~Wings Use CMs
Blossom Place N Punch to punch out one blossom from the same yellow used for the body.  Cut this in half and round of the pointy edges.
Punch the following shapes using CMs Border Maker System
~Feet Using the Lace Scallop Cartridge, punch once from orange paper (I used the orange striped paper from the WSL Year to Remember Part 2 paper pack by CM in the layout shown below).
~Comb Use the
Blossom Place N Punch to punch one shape out of the orange paper. Trim this to make the shape shown.
Eyes Using the Bubble Maker Cartridge punch several times out of black and white cardstock.  Use “leftovers” to make eyes. 
~Beak From the leftover piece from the orange blossom, trim a small pointy piece from between two petals. 
~Assemble as shown below using your CM Tape Runner and the Repositionable Refill for intricate parts.

Sheep
Creative Life Scrapbooking Blog Hop - Lisa's Workshop
~Using the CM Shape Maker System and the 2” Scalloped Circle Punch from Fun Stampers Journey, Punch out one shape from white cardstock
(FSJ punches really do work in the CM Shape Maker System! Check out this blog post for more info!!)

~Using the CM Cherry Blossom Punch and black cardstock, punch one shape.  Place it as shown in the CM Shape Maker System with the Circle Cartridge and punch to get the sheep's face/ears.Creative Life Scrapbooking Blog Hop - Lisa's Workshop
Punch the following shapes using
CMs Border Maker System:
~Legs
Using the Filmstrip cartridge, punch once from white cardstock.  Cut one of the leftover rectangles in half and use for the legs.
~Eyes Using the Bubble Cartridge punch several times out of black and white cardstock.  Use “leftovers” to make eyes. 
~Using the Medallion Frame Chain Cartridge punch once out of white and black cardstock.  Cut in half one of the leftover black shapes to use for the hooves and use 3 of the white shapes for hair.

~Assemble as shown below using your CM Tape Runner and the Repositionable Refill for intricate parts.

Kiwi Lane Templates
Kiwi Lane Designs (KLD) has a scrapbooking system that is simple, inspirational, and fun called Play-to-Create.

I use this system and Kiwi Lane Designer Templates often to plan out my pages, including the one shown below.  You are able to see through the templates so I was able to choose templates and place them so they cover up the deer design on the paper – it’s cute but I didn’t want it to show in this layout.  Once I was satisfied with the layout I traced these shapes on to my paper, cut them out and then inked the edges before assembling.
You can learn more about the “Play-to-Create” system here.
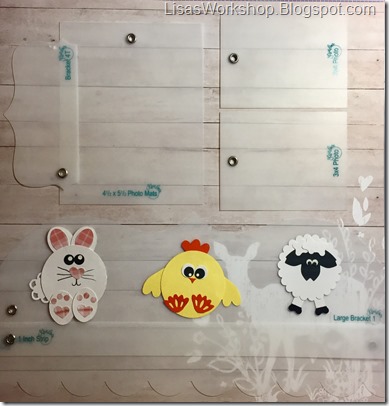
Creative Life Scrapbooking Blog Hop - Lisa's Workshop
I used KLD Designer Templates from the following sets:
Tiny Brackets, Scallops, Large Bracket, Photo Mats and Mini Photo Set.
Creative Life Scrapbooking Blog Hop - Lisa's Workshop

Here is the finished layout!

Creative Life Scrapbooking Blog Hop - Lisa's Workshop I love the way inking the edges brings the elements on the page together and adds just a little extra touch. Creative Life Scrapbooking Blog Hop - Lisa's Workshop
Thanks for stopping by!
I hope these ideas have inspired you and I can’t wait to see your take on them! Please feel free to share what you’ve created in my
Lisa’s Workshop Facebook group.

Here is the complete line up for today’s
Creative Life Scrapbooking’s Spring Blog Hop:

You can find more information about the products I used in this project from CM, FSJ and KLD on my affiliate websites. I love the products these companies offer so much, and how they all work together so well, that I decided to sell and promote them!  Find more information about the products I’ve used and more on the following sites:
Creative Memories:
http://www.creativememories.com/user/lisagraham
Fun Stampers Journey: http://www.funstampersjourney.com/LisaGraham Kiwi Lane Designs: https://lisagraham.kiwilaneinstructor.com/

 You’re also welcome to contact me directly by clicking on the “Email me” link at the top of this page.

Happy Spring!