I've Moved!

I've Moved!
Please visit my new blog!

This blog contains affiliate links!

Some of the links in the posts on this blog are “affiliate links.” This means if you click on the link and purchase the item, I will receive an affiliate commission (Thank you!) Regardless, I only recommend products or services I believe will add value to my readers.
Email me ..........................
Showing posts with label CCS. Show all posts

Wednesday, May 29, 2019

2019 Spring CLS Blog Hop


Welcome to Creative Life Scrapbooking's (CLS) 2019 Spring Blog Hop! 

If you’re hopping in order, you came from Stefani's Blog.  At the end of my post I’ll send you on your way to Fran’s blog. Be sure to visit each stop – there are lots of  wonderful ideas being shared!  (More info, including the complete list of Blog Hop stops, is at the bottom of this post.)
Today I’m sharing layouts using products from Creative Memories and featuring the Travel Log and Great Excape Collection. The photos are from one of our stops during our Alaska Cruise when we visited Carcross.  Where is Carcross?  I'm glad you asked!


Lisa's Workshop - Spring Blog Hop  Canada and Alaska Cruise Photos
Papers from the CM Great Escape Collection
 
Lisa's Workshop - Spring Blog Hop  Canada and Alaska Cruise Photos
Embellishment from the CM Travel Log Collection
To make the globe I used the Custom Cutting System and the Jumbo Circle Pattern. This is now retired but if you would like to use one (or other retired tools) contact your CM Advisor.
Chances are they have one you can borrow!
The paper I used for this globe layout is from the Great Escape Collection and I thought it was perfect for these photos!  Don't worry if you love the colors in this collection but don't have Canadian themed photos - the designers at CM have wisely designed the printed paper packs so that one side of the paper is generic. 
Lisa's Workshop - Spring Blog Hop  Canada and Alaska Cruise Photos

Lisa's Workshop - Spring Blog Hop  Canada and Alaska Cruise Photos

Thanks for stopping by!  I hope these ideas have inspired you and I can't wait to see your take on them!  Please feel free to share what you've created in my Lisa's Workshop Facebook Group Here is the complete line up for today’s
Creative Life Scrapbooking’s 2019 Spring Blog Hop:
 
Noreen Smith
Karyn McDermaid-Rolfe
Julie Tambrini
Diana Miller Brinsley
Stefani Jones
Lisa Brown Graham (you are here!)
Fran Allen Smitherman

Please contact your Creative Memories Advisor to purchase any Creative Memories products.
If you don't already have a Creative Memories Advisor, I’m happy to help! 
You can find more information about the Creative Memories products used in this project on my CM Advisor site at:
http://www.creativememories.com/user/lisagraham
or if you’d like to contact me directly you can do that by clicking on the “Email me” link at the top of this page.
Photobucket

Saturday, September 22, 2018

Gather Together Collection

Did you join in on the fun during Creative Life Scrapbooking PJ Party last night?  If not, no worries!  The posts are on our FB page and you can access them when it’s convenient.  The PJ Party featured ideas using the Gather Together collection from Creative Memories.

Gather Together by Creative Memories

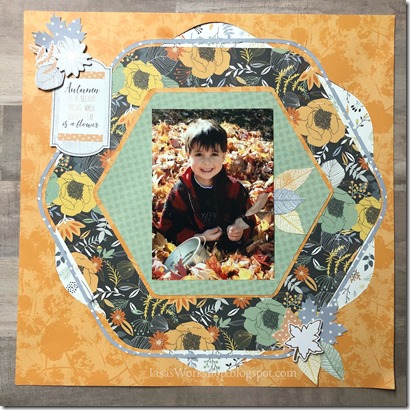
I think CM knocked this one out of the park!  The Gather Collection is fun & flowery but not too feminine, making it very versatile! The patterned papers, embellishments and mats have a fall theme and I think this collection was perfect for these photos! 

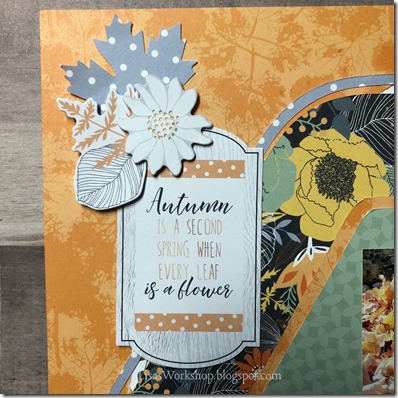
Gather Together by Lisa's WorkshopLots of hexagons cut with the CM Custom Cutting System! They made a nice background for one of my favorite photos. I fussy cut out those leaves that are tucked behind the photo and in the embellishment cluster at the bottom of the page, but it was easy - not fussy at all!Gather Together by Lisa's WorkshopHexagon Sizes Shown: From the orange paper I cut a hexagon using the outside of the pattern with the Blue Blade. I then trimmed this hexagon down using the Red Blade & outside of the pattern but flipped the paper over to the dark floral pattern. The grey hollow hexagon was also cut using the outside of the hex pattern & first the Blue Blade then the Green Blade. Cuts made inside the hex pattern were made for the orange hexagon using the Green Blade and the green hexagon using the Blue Blade.

Gather Together by Lisa's WorkshopSince the left side layout was a little busy I wanted to keep this side a little more simple. Using mats from the Variety Mat Pack under the photos helped to make this page come together in a snap!Gather Together by Lisa's WorkshopTucked a maple leaf behind one of the foil embellishments to help tie it together with the rest of the layout. Gather Together by Lisa's WorkshopThe yellow & green leaves are cut from one of the Gather Together patterned papers. The grey leaf is punched with the Maple Leaf Punch and the other 2 are from the embellishment pack.

Gather Together by Lisa's Workshop

Thanks for visiting!!  Hop on over to Lisa’s Workshop or CLS to share your version of this layout, or another using the Gather Collection! 

Products Featured in this layout:

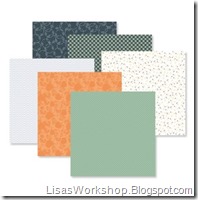
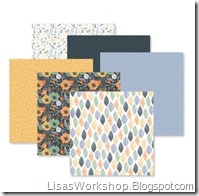
Gather Together EmbellishmentsGather Together EmbellishmentsHexagon CCS PatternMaple Leaf PunchGather Together Variety Mat PackGather Together Patterned PaperGather Together Patterned Paper

Lisa's Workshop

Thursday, August 31, 2017

Sunshine & Rainbow

Today’s Friday Featured Project over at Creative Life Scrapbooking is a fun, simple way to brighten up your pages. 

CLS Friday Featured Project - Lisa's Workshop
This comes together quickly thanks to the Creative Memories Custom Cutting System.

If you’re not familiar with the CCS Labeling System please see this earlier post.

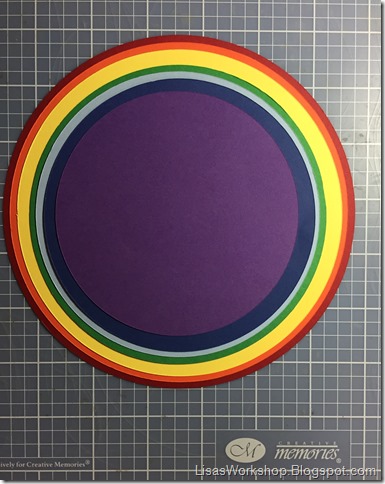
Using the CCS and the Circle Patterns I cut the following circles:
Red – 3OB
Orange – 3OG
Yellow – 3OR
Green – 2OB
Blue – 2OG
Indigo – 2OR
Violet - 1OB
Inside of Rainbow/Background paper – 1OR

CLS Friday Featured Project - Lisa's WorkshopYou can see from the photo above that the circles don’t match up exactly.  There is a bit of a gap between circles cut from different patterns.

CLS Friday Featured Project - Lisa's Workshop
I nestled the circles together a bit towards the top and then adhered them all together, cutting this large circle in half to make a rainbow. 

CLS Friday Featured Project - Lisa's Workshop
To make the clouds, I used the (no longer available) Word Bubble Punch and snipped off that little pointy bit.  I outlined these with the bold tip of a Dual Tipped blue pen to help them stand out a little.

CLS Friday Featured Project - Lisa's Workshop
I placed a circle in the center of the rainbow cut from cardstock that matched the background paper to make it look like an arch instead of a circle.


The sun was also made using the CCS – I added strips of paper for the rays.
Orange - 3IG
Yellow – 3IB

Hope this brightens your day!

Please contact your Creative Memories Advisor to purchase any Creative Memories products.
If you don't already have a Creative Memories Advisor, I’m happy to help! 

You can find more information about the Creative Memories products used in this project on my CM Advisor site at:
http://www.creativememories.com/user/lisagraham
or if you’d like to contact me directly you can do that by clicking on the “Email me” link at the top of this page.

Tuesday, December 6, 2016

CM Christmas Blog Hop

Hello & Welcome!!

CM Christmas Blog Hop
You have reached the 2nd stop on the
CM Bloggers’ Christmas Blog Hop.  
Some of my sister
CM Advisors and I are sharing ideas and inspiration for your Christmas layouts and projects.  If you’re hopping in order, you’ve arrived from Karyn’s blog.  At the end of my post I’ll send you on your way to Diana’s blog. Be sure to visit each stop – there are lots of  wonderful ideas being shared!  (More info, including the complete list of Blog Hop stops, is at the bottom of this post.)

Today I’m sharing some quick & fun elements for your baking themed layouts.  CM Christmas Blog Hop
This fun layout came together in no time thanks to some of my favorite CM tools.  It features items made using the Christmas Past Collection.
CM Christmas Blog Hop
(Click on the photos to enlarge them)

Here is how to make each of the elements shown above:
Apron
Cut a 4”x 3” rectangle from whatever patterned paper  you’d like to use for the base.  With the 3” side at the top, mark 1/2” in from each end and 2” down from the top.

CM Christmas Blog Hop
Using your Custom Cutting System and Oval Patterns Make the following cut on each side of the rectangle as shown:
5 O R
CM Christmas Blog Hop 
If you are not familiar with the system used to label the CCS see this post.

Add some coordinating paper, stickers, borders, etc. and a thin strip of paper at the top for the strap.CM Christmas Blog Hop
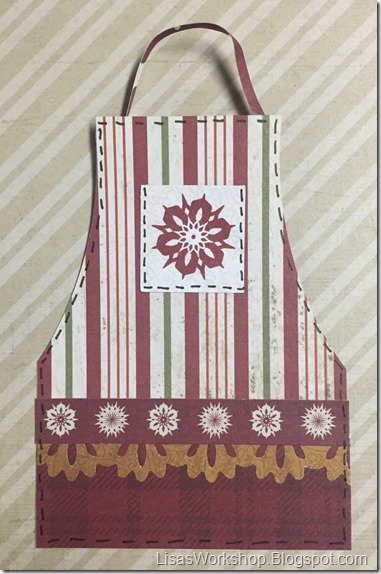
All of the items I used to make the apron shown above came from the Christmas Past paper pack.  I punched out the ‘'lace” using the Border Maker System and Lace Scallop Border Maker Cartridge and then added a little bit of faux stitching using the fine point of the CM Dual Tip Black Pen.
The snowflake pocket and strip are from one of the patterned papers, too.
When you add the layer to the bottom, you could easily create a real pocket - leaving it open at the top so you could add a journaling card…or a gift card, paper money or a note to use in other projects.

Tray of Gingerbread Men
Using the Shape Maker System and Square Cartridge, punch out a square from the Silver Shimmer cardstock.  Punch out 4 gingerbread men from brown cardstock using the Christmas Quartet Punch.CM Christmas Blog Hop

Handles
Again using the Silver Shimmer cardstock, first cut 4 I B then without moving the Oval CCS Template, cut 4 I G.  You’ll end up with an oval ring. Cut this in half to make the handles and attach to the back of your square cookie sheet.  CM Christmas Blog Hop

Cookies
CM Christmas Blog Hop

Chocolate Chip Cookie
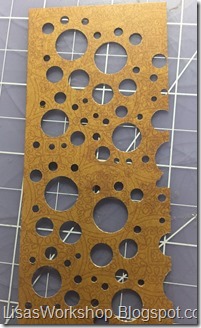
Using the Border Maker System and the Bubble Cartridge punch a few times on a 2” wide strip of paper, alternating sides.  If you want to make the holes more random, flip the paper over before punching on the 2nd side.
 CM Christmas Blog Hop
Use the Shape Maker System and Circle Cartridge to punch out a circle from this hole-y paper Smile  Punch another circle from brown cardstock. Adhere the hole-y circle on the brown circle using your Repositionable Tape Runner
  (It’s perfect for small spots like this).
CM Christmas Blog Hop

Sandwich cutout:
Use the Shape Maker System and Circle Cartridge to cut out your top layer.  Using your CCS & Circle Patterns, cut:
Filling:  2 I G
Bottom layer:  2 I G
Center the top layer on the filling and adhere using your Tape Runner.  Adhere this to the bottom layer, offsetting slightly. 

Add a shape cut from the same paper used for your filling punched with the Christmas Quartet Punch and adhere to the top of the cookie.
CM Christmas Blog Hop

Sprinkles
Using the Shape Maker System and the Circle Cartridge, punch out a circle from brown cardstock.  Using the Repositionable Tape Runner, put adhesive all over one side of this circle.
CM Christmas Blog Hop

The sprinkles are leftovers made when using the Border Maker System and the Lace Scallop Border Cartridge.  Make a bunch of these and place them on your sticky brown circle.  Press them down really well and rub your finger over the leftover adhesive.  It will roll off easily. CM Christmas Blog Hop
I punched my sprinkles from the striped paper shown below from the Christmas Past paper pack.

CM Christmas Blog Hop

The Christmas Past paper pack has 12 double sided sheets with 24 unique designs.  You can click here to browse all the designs in this pack.

p

Sprinkles!
CM Christmas Blog Hop
Here is a closer look at each page. (Click to enlarge)013c1b06d85c91728279e2c4222ee0d51979c797dc
“Christmas Memories” sticker is from the Christmas Past Sticker Pack.

01ae7b68df0307dcafc462eea49a6f9426796e87c0

I hope these ideas have inspired you! If can’t wait to see your take on them! Please feel free to share what you’ve created in my Lisa’s Workshop Facebook group.

Thanks for stopping by!  I will now send you on your way to the next stop in the CM Bloggers Christmas Hop -  Diana’s blog.

Here is the complete line up for today’s
CM Bloggers’ Christmas Blog Hop:

Karyn McDermaid-Rolfe
Lisa Brown Graham <-----You are here!
Diana Miller Brinsley
Stefani Jones
Fran Allen Smitherman
Noreen Smith

Please contact your Creative Memories Advisor to purchase any Creative Memories products.
If you don't already have a Creative Memories Advisor, I’m happy to help! 

You can find more information about the Creative Memories products used in this project on my CM Advisor site at:
http://www.creativememories.com/user/lisagraham
or if you’d like to contact me directly you can do that by clicking on the “Email me” link at the top of this page.

Merry Christmas! 

Wednesday, March 16, 2016

CM Easter Blog Hop

Hello & Welcome!!

You have reached the 7th stop on the CM Easter Blog Hop.   My fellow CM Advisors and I are sharing ideas and inspiration for your Easter and spring layouts and projects from Creative Memories.  If you’re hopping in order you’ve arrived from Diana’s blog and at the end of my post I’ll send you on your way to Fran’s blog.  Be sure to visit each stop and finish up on the CM Blog to see all the wonderful ideas.  If you leave a comment on the CM Blog you’ll be eligible to win a fantastic prize bundle! (More info, including the complete list of Blog Hop stops, is at the bottom of this post.)

My layout features items from the Fresh Picks product line.  This is such a beautiful collection!! The colors are dreamy – and just perfect for spring and Easter.CM Easter Blog Hop - Stop 7 Lisa's Workshop
I love the colors in this layout and am a bit embarrassed to share it because it came together so quickly thanks to the wonderful coordinating products and time-saving tools from Creative Memories.  For the background I used two pieces of patterned paper from the Fresh Picks paper pack and cut each in half lengthwise. I split the patterns apart (even though it looks like there is a whole sheet in the middle) and adhered a pre-designed border on top to join the two patterns together.  Many of the CM paper packs include sheets of pre-designed borders and accent artwork  – including Fresh Picks. These are so beautiful and easy to use! I used the green border that is third from the top shown below.

CM Easter Blog Hop - Stop 7 Lisa's Workshop

Left Side LayoutCM Easter Blog Hop - Stop 7 Lisa's Workshop
The piece with the banner under the cross (see below for details on how to make this cross) is also pre-designed artwork. I am going to use it as a spot for my journaling.  I used pieces from the Fresh Picks Slide-In pack for mats for my photos.  I think that I’ll use black & white photos for this layout.  I think the colors in the Fresh Pick products will compliment B&W photos beautifully!! CM Easter Blog Hop - Stop 7 Lisa's Workshop
This sheet of artwork is included in the Fresh Picks paper pack. (This set features 12 sheets of double-sided paper, including 2 sheets of pre-designed border strips and 2 sheets of pre-designed accent artwork plus tone-on-tone and designer artwork that's simply stunning!)

Right Side LayoutCM Easter Blog Hop - Stop 7 Lisa's Workshop
Again I used pieces from the Fresh Picks Slide-In pack and paper pack and added a title using the Watercolor Green ABC/123 stickers.

Diamond Scroll CrossCM Easter Blog Hop - Stop 7 Lisa's Workshop

CM Easter Blog Hop - Stop 7 Lisa's Workshop
Use the
Border Maker System with the Diamond Scroll Cartridge  and punch 5 times.  You can make a whole border if you like or use the punch on it’s own (without using the paper guide first) – you’ll just need the inside part of the punched design and it’s not necessary to make sure the punches are aligned.  Cut out the inside design from the diamond scroll punches as shown above and adhere these pieces to white cardstock*using the Mini Tape Runner adhesive to tack down those small spots.  Add a 1/2 pearl from the Fall In Embellishment pack (they come with adhesive on them – super easy to use!) to the center of the cross to complete the design.

Using the Custom Cutting System and the Oval Patterns, cut around the cross and additional ovals for mats. Layer, adhere & that’s it!  In just a few minutes from start to finish you have a 2-page layout!

After I get my photos on the page I may add an embellishment or two from the coordinating Fresh Picks Embellishments pack.  I just love those butterflies and think those may find a home on this layout – maybe with a flower or two!

CM Easter Blog Hop - Stop 7 Lisa's Workshop

* Did you hear the good news?  CM has found a domestic milled cardstock supplier, so the solid cardstock we know and love will once again be a part of the CM core line!  You can now find a few colors in the core line of products and new colors will be added as they become available!!!!!

Thanks for stopping by!  I will send you on your way to Fran’s blog which is the next stop on the CM Easter Blog Hop.
 
Here is the complete line up for today’s Blog Hop:

CM Easter Blog Hop
Noreen Smith
Sarah Fitzgerald
Candace Bouldin
Julie Tambrini
Diana Miller Brinsley
Stefani Jones
Lisa Brown Graham <-----You are here!
Fran Allen Smitherman
CM Blog
<--- Leave a comment to win a wonderful Fresh Picks prize bundle!!

Please contact your Creative Memories Advisor to purchase the Fresh Picks collection or any other Creative Memories products.
If you don't already have a Creative Memories Advisor, I’m happy to help! 

You can find more information about the Creative Memories products used in this project on my CM Advisor site at 
http://www.creativememories.com/user/lisagraham
or if you’d like to contact me directly you can do that by clicking on the “Email me” link at the top of this page.

Wishing you a Blessed Easter!!

Lisa's Workshop