![]()
Fun Stampers Journey is a direct sales company that sells a LOT of stamps, dies and other fun products. Being much more of a scrapbooker than stamper, FSJ really wasn’t on my crafty radar until I learned that the Punches that FSJ sells fit in the Creative Memories Shape Maker System. This system (FSJ sells the system, too) is a favorite tool of mine and is being sold only while supplies last by CM. CM only offers 2 additional cartridges for the system, too so I was thrilled when I found out FSJ has many more options for this great tool!! (Read more about FSJ Punches in the CM Shape Maker System in this blog post.)
I also fell in love with FSJs cardstock. It’s more like the “old” CMs cardstock than that from the New CM. It’s acid free, lignin free & buffered and comes in a lot of colors. Plus, the weight is consistent across the board, unlike new CM where there is a noticeable difference (all within the companies acceptable tolerance level) between some of the cardstock packs.
Look at all these colors!!!
Those two product lines alone pushed me over the edge and long story short…I’m a Fun Stampers Journey Coach.
FSJ offers many coordinating die/stamp sets. I used one (called Sea Friends) on the layout below. Almost done - just need to do a little bit of journaling.
Right hand side of the layout. The seaweed, starfish & crab were first stamped and then die cut using the Journey Grand die cutting/embossing machine.
Left hand side of the layout - I started with Beech Breeze cardstock and stamped a random pattern with the Sea Friends stamps using Beech Breeze Color Fusion ink. I LOVE how the same colors carry over through the various products in the FSJ line. That fun Mermaid and the star/bubble stamp was a past Bloom Benefit – you get one Bloom Benefit for every $50 spent on FSJ product!
Added a little dimension with Small FSJ Foam Squares.
This is one thing I LOVE about stamping backgrounds – the 2 pieces of background paper look like they were made for each other. They were! I just lined them up and stamped where both pieces met.
The "stitches" on the baseball in the layout below were made with the FSJ Chevron Trends punch (TO-0002) which sells for $11.96. This punch (and all those from FSJ) works with both the FSJ punch Handle Punch Handle (TO-0031 which sells for $10.36) and the CM Shape Maker System.
Thanks for taking a peek! As always, if you have any questions please feel free to contact me by clicking on the “Email Me” button at the top of my blog.
This blog contains affiliate links!
Wednesday, April 5, 2017
FSJ on Scrapbook Pages
Sunday, April 2, 2017
Spring Blog Hop
Welcome to Creative Life Scrapbooking's (CLS) Spring Blog Hop!
At CLS, we are a circle of photo lovers, memory keepers, scrapbooking and paper crafting enthusiasts, and bloggers. Our mission is to provide inspiration and education that will encourage people everywhere to celebrate their memories, exercise their crafty talents, and engage in a truly Creative Life!
Be sure to “Like” and follow our Facebook page at https://www.facebook.com/CreativeLifeScrapbooking/ for information about upcoming blog hops and more.
If you’re hopping in order, you’ve arrived from Karyn’s blog. At the end of my post I’ll send you on your way to Diana’s blog. Be sure to visit each stop – there are lots of wonderful ideas being shared! (More info, including the complete list of Blog Hop stops, is at the bottom of this post.)
Today I’m sharing some fun Punch Art Pals for your spring pages.
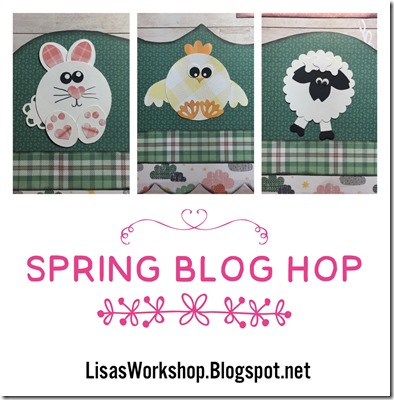
For the project I created for this Blog Hop I used products from 3 of my favorite companies; Creative Memories, Fun Stampers Journey and Kiwi Lane. Most of the papers I used are from CM’s Woodland Whimsy Girl Collection.
Here’s how I made the fun Punch Art Pals
Bunny
~Body Punch out a circle using the CM Shape Maker System with the Circle Cartridge from white cardstock
~Ears and Feet
Using your Custom Cutting System and Oval Patterns Make the following cuts:
White cardstock - 4IG x4
Pink Plaid paper from CMs Woodland Whimsy Girl Paper Pack - 4IB x2 for the inside of the ears
(If you are not familiar with the system used to label the CCS see this post.)
~Punch the following shapes using CMs Border Maker System:
~Lace Flower Chain Cartridge punch one flower from white cardstock and use for tail.
~Heart Chain Cartridge – punch once from the pink plaid paper from CM’s Woodland Whimsy Girl paper pack, saving the “leftover” hearts. Use these hearts on the paws and for the nose.
~Using the Bubble Maker Cartridge punch several times out of black and white cardstock. Use “leftovers” to make eyes.
~Using the Bubble Maker Cartridge punch several times out of the pink plaid paper and use the “leftovers” on the top of the feet.
~Add detail with the fine tip end of CMs Black Dual Tip Pen.
~Assemble as shown below using your CM Tape Runner and the Repositionable Refill for intricate parts.
Chick
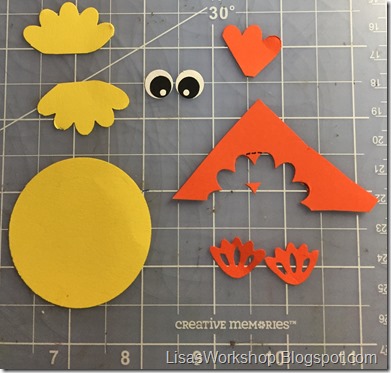
~Body Punch out a circle using the CM Shape Maker System with the Circle Cartridge from yellow cardstock (I used the yellow plaid from CM’s Hello Baby Girl paper pack in the layout shown below).
~Wings Use CMs Blossom Place N Punch to punch out one blossom from the same yellow used for the body. Cut this in half and round of the pointy edges.
Punch the following shapes using CMs Border Maker System
~Feet Using the Lace Scallop Cartridge, punch once from orange paper (I used the orange striped paper from the WSL Year to Remember Part 2 paper pack by CM in the layout shown below).
~Comb Use the Blossom Place N Punch to punch one shape out of the orange paper. Trim this to make the shape shown.
Eyes Using the Bubble Maker Cartridge punch several times out of black and white cardstock. Use “leftovers” to make eyes.
~Beak From the leftover piece from the orange blossom, trim a small pointy piece from between two petals.
~Assemble as shown below using your CM Tape Runner and the Repositionable Refill for intricate parts.
Sheep
~Using the CM Shape Maker System and the 2” Scalloped Circle Punch from Fun Stampers Journey, Punch out one shape from white cardstock
(FSJ punches really do work in the CM Shape Maker System! Check out this blog post for more info!!)
~Using the CM Cherry Blossom Punch and black cardstock, punch one shape. Place it as shown in the CM Shape Maker System with the Circle Cartridge and punch to get the sheep's face/ears.
Punch the following shapes using CMs Border Maker System:
~Legs Using the Filmstrip cartridge, punch once from white cardstock. Cut one of the leftover rectangles in half and use for the legs.
~Eyes Using the Bubble Cartridge punch several times out of black and white cardstock. Use “leftovers” to make eyes.
~Using the Medallion Frame Chain Cartridge punch once out of white and black cardstock. Cut in half one of the leftover black shapes to use for the hooves and use 3 of the white shapes for hair.
~Assemble as shown below using your CM Tape Runner and the Repositionable Refill for intricate parts.
Kiwi Lane Templates
Kiwi Lane Designs (KLD) has a scrapbooking system that is simple, inspirational, and fun called Play-to-Create.
I use this system and Kiwi Lane Designer Templates often to plan out my pages, including the one shown below. You are able to see through the templates so I was able to choose templates and place them so they cover up the deer design on the paper – it’s cute but I didn’t want it to show in this layout. Once I was satisfied with the layout I traced these shapes on to my paper, cut them out and then inked the edges before assembling.
You can learn more about the “Play-to-Create” system here.
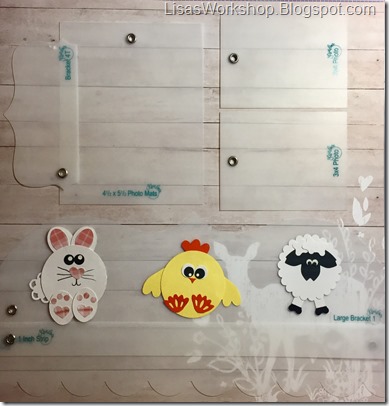
I used KLD Designer Templates from the following sets:
Tiny Brackets, Scallops, Large Bracket, Photo Mats and Mini Photo Set.
Here is the finished layout!
I love the way inking the edges brings the elements on the page together and adds just a little extra touch.
Thanks for stopping by!
I hope these ideas have inspired you and I can’t wait to see your take on them! Please feel free to share what you’ve created in my Lisa’s Workshop Facebook group.
Here is the complete line up for today’s
Creative Life Scrapbooking’s Spring Blog Hop:
- Stefani Jones at Crop With Stef
- Fran Smitherman at Celebrating Your Beautiful Life
- Noreen Smith at Organized and Creative Mom
- Candace Bouldin at Scrappin’ JPEGs
- Karyn McDermaid-Rolfe at Karyn Crops
- Lisa Graham at Lisa’s Workshop <---You are here!
- Diana Brinsley at D. Brinsley’s Memory Keeping Blog
You can find more information about the products I used in this project from CM, FSJ and KLD on my affiliate websites. I love the products these companies offer so much, and how they all work together so well, that I decided to sell and promote them! Find more information about the products I’ve used and more on the following sites:
Creative Memories:
http://www.creativememories.com/user/lisagraham
Fun Stampers Journey: http://www.funstampersjourney.com/LisaGraham Kiwi Lane Designs: https://lisagraham.kiwilaneinstructor.com/
You’re also welcome to contact me directly by clicking on the “Email me” link at the top of this page.
Happy Spring!
Monday, October 24, 2016
Halloween Blog Hop
Hello & Welcome!!
You have reached the 3rd stop on the
CM Bloggers’ Halloween Blog Hop.
Some of my sister CM Advisors and I are sharing ideas and inspiration for your Halloween layouts and projects. If you’re hopping in order, you’ve arrived from Karyn’s blog. At the end of my post I’ll send you on your way to Julie’s blog. Be sure to visit each stop – there are lots of wonderful ideas being shared! (More info, including the complete list of Blog Hop stops, is at the bottom of this post.)
I was inspired by the vintage look of the Bats in the Belfry Collection by Creative Memories to create these embellishments.
Have you tried CM’s new Repositionable Tape Runner Refill? It was very handy when making these items. The refill fits in the regular CM Tape Runner case! This adhesive comes out in a pattern of tiny dots, so it’s really good for small, intricate pieces and because it’s repositionable it’s super easy to make adjustments to your design. After applying any excess adhesive rubs right off. The adhesive becomes more tacky over time but never becomes permanent.
For the base of each decoration you’ll need:
- One 12” border made using the Border Maker System and the Lace Scallop Cartridge
- One circle cut using the Custom Cutting System and the Circle Patterns. Cut one 3IR (check out this post for info regarding labeling your CCS).
Snip just the bottom of each scallop of the 12” border so you can curve it around the circle.
Using the Repositionable Tape Runner – place adhesive on the lower, pointy part (the part you snipped) of the front side of the lace scallop border and on the edge of the back of your circle.
with the wrong side of the paper facing you (if using double sided paper), place the two ends of the border together on the circle and loosely place the rest of your border around the circle, adjusting & repositioning when needed. Once you have the border in place, smoosh it down to flatten & adhere.
Flip the base over and add layers to your design using items from the Bats in the Belfry collection. Everything coordinates so it’s really hard to go wrong! Add circles that are cut with the Custom Cutting System, and punched with the Shape Maker System from the paper pack, add stickers & embellishments using Foam Squares to add a bit of dimension.
The Scalloped Circle shown below was punched using the CM Shape Maker System and the 2” Scalloped Circle punch from Fun Stampers Journey. FSJ offers punches that work with CMs Shape Maker System! Read more in this earlier blog post.
I hope these have inspired you! If can’t wait to see your version of this design…please feel free to share what you’ve created in my Lisa’s Workshop Facebook group.
Thanks for stopping by! I will now send you on your way to the next stop in the CM Bloggers Halloween Hop - Julie’s blog.
Here is the complete line up for today’s Blog Hop: CM Bloggers’ Halloween Blog Hop
- Noreen Smith at Organized and Creative Mom
- Karyn McDermaid-Rolfe at Karyn Crops
- Lisa’s Workshop <-----You are here!
- Julie Tambrini at Julie’s Creative Memories Blog
- Candace Bouldin at Scrappin’ JPEGs
Happy Halloween!
Saturday, October 1, 2016
World Card Making Day–October 1, 2016!
According to DaysOfTheYear.com: “World Card Making Day reminds us that the best gifts come from the heart, and the hands and vision of the people we love, so get out there and try making a card of your own! “
This card uses products from my 3 favorite paper crafting companies – Creative Memories, Kiwi Lane and Fun Stampers Journey. I love these companies’ products so much that I’ve teamed up with them as a CM Advisor, KL Instructor and FSJ Coach! Each company has fantastic products and to celebrate Richie’s 15th birthday and World Card Making Day I made this card with products from all 3 companies.
When I saw the fun Level Up stamp set from Fun Stampers Journey I knew it would be perfect for my favorite gamers!
The background paper is from the new Creative Memories Denim Blues Paper Pack and the “15” is from the CM Denim Blues ABC/123 Stickers Pack.
I used the Delight Template from Kiwi Lane to create the zig zag shape on paper from the KL Live Life Paper Kit.
All images on the card and envelope (shown below) were stamped using the Black Licorice True Color Fusion Ink from FSJ. I colored the images with the Journey Color Burst Pure Color Pencils (LOVE those!!)
Added Richie’s name with the CM Denim Blues ABC/123 stickers.
Kiwi Lane is having a great sale in honor of World Card Making Day.
Buy any one Layout Kit and get another one ½ off (Reg $7.00 each). Plus save 10% off all Card Designer Templates (includes Card Borders, Mini borders and Tiny Accessory sets. Remember – shipping is free with your $35+ order!
Kiwi Lane has been celebrating all week long on their Facebook page. Head over there for details on a fun giveaway ending midnight tonight (Oct. 1st 2016) and lots of great project ideas.
Head over to the CM Blog for A Year to Remember Cards & Envelope Tutorial